Reading Time: 3 mins
Overview
MySQL, open-source software and most widely opted relational database management system (RDBMS). It is also a component of the LAMP (Linux, Apache, MySQL, Perl/PHP/Python) software stack and supports almost every other operating system. This article will help you to find the how-to of installing, updating and testing Magento using MySQL database server on Ubuntu 18.04.
Pre-conditions
- It is to be noted that the given instructions are applied to installing MySQL server on Ubuntu 18.04.
- Presuming that you are logged in as a non-root user (wherein sudo privileges is necessary).
Step 1: Updating the default packages
It is necessary to check whether the default packages are up to date.
To update the package index on your server, use the command:
sudo apt-get update
Now it is ready for the installation process.
Step 2: Installing MySQL
Soon after updating the package list, the installation step is all about giving a command through apt-package manager.
sudo apt-get install mysql-server
MySQL has been successfully installed in your system.
Step 3: Configuring MySQL (Optional)
To make the MySQL secure (as it is initially not, due to the mere installation), you need to run the security script as:
sudo mysql_secure_installation
This will eventually impact some of the less secure options such as the sample users and remote root login. In the upcoming prompts, you can enable the Validate Password Plugin and confirm a unique password for the roost user. Post which you can proceed by answering all the regular questions by pressing Y and Enter.
Note: For versions before 5.7.6, use mysql_install_db and for versions 5.7.6 and later ones, use mysqld –initialize.
Step 4: Configuring the root user authentication and other privileges
To configure the password authentication, you need to switch its authentication path from auth_socket to mysql_native_password
Open the MySQL prompt by
sudo mysql
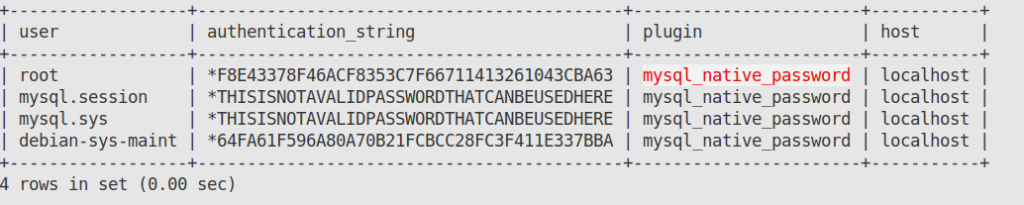
Next, to check the authentication path used by the MySQL accounts:
mysql> SELECT user,authentication_string,plugin,host FROM mysql.user;

From the above output, it is obvious that the user is authenticated by the auth_socket plugin. To configure this authentication, use ALTER USER command.
mysql> ALTER USER ‘root’@’localhost’ IDENTIFIED WITH mysql_native_password BY 'password';
Note: Be sure to create a strong password and thereby, the previous password created by the user will be replaced by the new strong password.
To make the changes into effect, reload your server by running FLUSH PRIVILEGES:
mysql> FLUSH PRIVILEGES;
To cross-check the non -authentication by auth_socket plugin, use the command:
The above output confirms that your server runs using the authentication of mysql_native_password
Now exit the MySQL shell by using the command:
mysql> exit
To connect the MySQL with a dedicated user, open the shell again by the command:
sudo mysql -u root -p
To create a database, use the command:
mysql> CREATE DATABASE database _name;
Now, create a new user with password (strong)
mysql> CREATE USER ‘charlie’@’localhost’ IDENTIFIED BY ‘password’;
For granting the user privileges, use the command:
mysql> GRANT ALL PRIVILEGES ON *.* TO ‘charlie’@’localhost’ WITH GRANT OPTION;
Here, you need not do the FLUSH PRIVILEGES as a new user was created rather altering the existing one.
mysql> FLUSH PRIVILEGES;
Now that the configuration of the user authentication and granting the necessary privileges are done, you can exit the shell using the command
mysql> exit